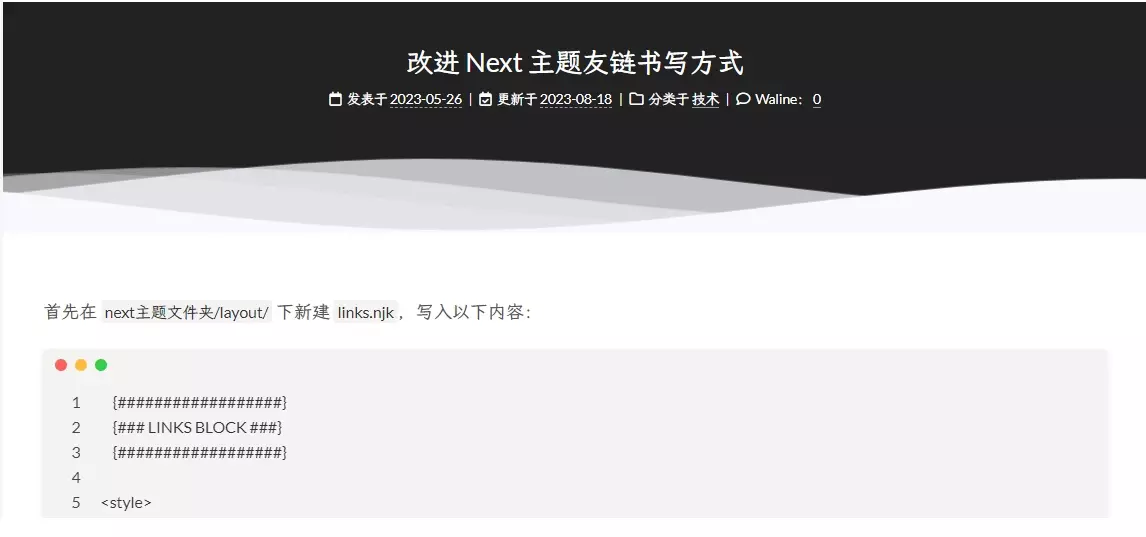
之前用 butterfly 的时候就看过安知鱼大佬的文章顶部加波浪效果的教程,又好像在哪里看到过 Next 也有人做出来过,但已找不到相关博客。两个月前早已萌发了自己做出来的念头,奈何看不懂 Next 使用的 njk 语法。
折腾的过程
将大佬的代码插入到 post 的生成模版的 <header> 标签末尾,添加 css 后却发现首页的文章卡片(下文简称为文章卡片)的 meta 信息部分和文章页的 meta 信息部分是同一个模版生成的。如果给文章页头部添加了波浪效果,文章卡片也会有波浪效果,这是我不希望看到的,于是放弃了一段时间。
前两天又想起这个效果,于是想着再试一试,这次我发现文章卡片与文章页的头部的描述部分(description 部分)的字体大小不一致,查看 css 后发现文章页的 description 多了一个类用以区分首页的 description。于是去找模版中对应的部分,发现有个 if 语句判断当前是否非主页,true 的话就添加了一个类名。这给了我很大信心,感觉只要分离主页和文章页的 <header> 就可以轻松实现了。
接下来遇到的问题是整个内容主体 <main> 有个 40px 的 padding,导致增加的波浪效果会变窄。想到的解决办法是把 <header> 放置在 <main> 上面,但尝试后遇到了文章卡片 <header> 结构同步变化、不能熟练使用 flex 布局达到使文章页 <header> 与 <main> 保持垂直分布且宽度一致的目的、由于 pjax 进入文章页后不能自动更新新的 <header> 的位置等阻碍。最终放弃把 <header> 与 <main> 分离这一想法。
无奈之下查询 Google 是否有办法让子元素不受父元素的 padding 的影响,结果发现只需要使子元素的 margin 的值为负的父元素的 padding 值即可。一拍脑袋,不知道自己之前怎么想的,明明是 css 的问题,却要去改变结构,总结是自己没理解好 margin 相关的知识导致的。
最后的方案就是给 <header> 加了个条件判断,如果是非主页就增加一个类,用以加 css 样式。这样就可以分开主页与文章页。至于大佬原来使用的是绝对定位来定位波浪位置,但 Next 的 <header> 的父元素没有使用相对定位,导致绝对定位参照的是 <main> 这个祖先元素,我将波浪改成了相对定位就解决了,虽然不知道有没有什么大的影响,不过测试下来没有什么问题。
唠了这么多,接下来就上代码了!
教程
打开 themes/next/layout/_macro/post.njk 并修改以下内容
1
2
3
4
5
6
7
8
9
10
11
12
13
14
15
16
17
18
19
20
21
22
23
24
25
26
27
28
| {%- if post.header !== false %}
- <header class="post-header">
+ <header class="post-header{% if not is_index %} insidepost-header{% endif %}">
<{% if is_index %}h2{% else %}h1{% endif %} class="post-title{% if post.direction and post.direction.toLowerCase() === 'rtl' %} rtl{% endif %}" itemprop="name headline">
{# Link posts #}
...
<div class="post-description">{{ post.description }}</div>
{%- endif %}
</div>
+ {% if not is_index %}
+ <section class="main-hero-waves-area waves-area">
+ <svg class="waves-svg" xmlns="http://www.w3.org/2000/svg" xlink="http://www.w3.org/1999/xlink" viewBox="0 24 150 28" preserveAspectRatio="none" shape-rendering="auto">
+ <defs>
+ <path id="gentle-wave" d="M -160 44 c 30 0 58 -18 88 -18 s 58 18 88 18 s 58 -18 88 -18 s 58 18 88 18 v 44 h -352 Z"></path>
+ </defs>
+ <g class="parallax">
+ <use href="#gentle-wave" x="48" y="0"></use>
+ <use href="#gentle-wave" x="48" y="3"></use>
+ <use href="#gentle-wave" x="48" y="5"></use>
+ <use href="#gentle-wave" x="48" y="7"></use>
+ </g>
+ </svg>
+ </section>
+ {% endif %}
</header>
{%- endif %}
|
这里提供一份方便复制的版本
1
2
3
4
5
6
7
8
9
10
11
12
13
14
15
16
17
| <header class="post-header{% if not is_index %} insidepost-header{% endif %}">
{% if not is_index %}
<section class="main-hero-waves-area waves-area">
<svg class="waves-svg" xmlns="http://www.w3.org/2000/svg" xlink="http://www.w3.org/1999/xlink" viewBox="0 24 150 28" preserveAspectRatio="none" shape-rendering="auto">
<defs>
<path id="gentle-wave" d="M -160 44 c 30 0 58 -18 88 -18 s 58 18 88 18 s 58 -18 88 -18 s 58 18 88 18 v 44 h -352 Z"></path>
</defs>
<g class="parallax">
<use href="#gentle-wave" x="48" y="0"></use>
<use href="#gentle-wave" x="48" y="3"></use>
<use href="#gentle-wave" x="48" y="5"></use>
<use href="#gentle-wave" x="48" y="7"></use>
</g>
</svg>
</section>
{% endif %}
|
接下来在 _config.next.yml 中取消 custom_file_path 的 style: source/_data/styles.styl 的注释,并在 根目录/source/_data/ 下创建 styles.styl,粘贴以下内容
1
2
3
4
5
6
7
8
9
10
11
12
13
14
15
16
17
18
19
20
21
22
23
24
25
26
27
28
29
30
31
32
33
34
35
36
37
38
39
40
41
42
43
44
45
46
47
48
49
50
51
52
53
54
55
56
57
58
59
60
61
62
63
64
65
66
67
68
69
70
71
72
73
74
75
76
77
78
79
80
81
82
83
84
85
86
87
88
89
90
91
92
93
94
95
96
97
98
99
100
101
102
103
104
105
|
.main-hero-waves-area {
width: 100%;
height: 5rem;
position: relative;
left: 0;
z-index: 5;
}
.waves-area .waves-svg {
width: 100%;
height: 5rem;
}
.parallax > use {
animation: move-forever 25s cubic-bezier(0.55, 0.5, 0.45, 0.5) infinite;
}
.parallax > use:nth-child(1) {
animation-delay: -2s;
animation-duration: 7s;
fill: #f7f9febd;
}
.parallax > use:nth-child(2) {
animation-delay: -3s;
animation-duration: 10s;
fill: #f7f9fe82;
}
.parallax > use:nth-child(3) {
animation-delay: -4s;
animation-duration: 13s;
fill: #f7f9fe36;
}
.parallax > use:nth-child(4) {
animation-delay: -5s;
animation-duration: 20s;
fill: #f7f9fe;
}
[data-theme="dark"] .parallax > use:nth-child(1) {
animation-delay: -2s;
animation-duration: 7s;
fill: #18171dc8;
}
[data-theme="dark"] .parallax > use:nth-child(2) {
animation-delay: -3s;
animation-duration: 10s;
fill: #18171d80;
}
[data-theme="dark"] .parallax > use:nth-child(3) {
animation-delay: -4s;
animation-duration: 13s;
fill: #18171d3e;
}
[data-theme="dark"] .parallax > use:nth-child(4) {
animation-delay: -5s;
animation-duration: 20s;
fill: #18171d;
}
@keyframes move-forever {
0% {
transform: translate3d(-90px, 0, 0);
}
100% {
transform: translate3d(85px, 0, 0);
}
}
@media (max-width: 768px) {
.waves-area, .waves-area .waves-svg {
height: 40px;
min-height: 40px;
}
}
.insidepost-header {
margin-left: -40px;
margin-right: -40px;
background: var(--theme-color);
margin-top: -70px;
padding-top: 40px;
}
.insidepost-header, .insidepost-header a, .insidepost-header .post-meta-container {
color: white;
}
.insidepost-header .post-meta-container {
margin-bottom: 40px;
}
.insidepost-header .post-description {
display: none;
}
.insidepost-header h1.post-title, .insidepost-header .post-meta-container {
padding-left: 40px;
padding-right: 40px;
}
@media (max-width: 991px) {
.insidepost-header {
margin-left: -20px;
margin-right: -20px;
}
.insidepost-header h1.post-title, .insidepost-header .post-meta-container {
padding-left: 20px;
padding-right: 20px;
}
}
|
然后打开网站看看效果吧!
效果图:
![文章顶部波浪效果图]()
参考
